
Browse and organize data products #
The Data products pane is organized into Data products and Domains tabs, where data products are grouped by their assigned domains.
Data products #
The Data products tab lets you view and use all of the curated datasets from your organization in a card grid layout or list view. Each view shows the selected data product’s Name, Summary, and Contacts.
By default, your data products present in a grid view apps.
Each card displays a Query button that opens the underlying schema in the query editor.
Click themore_vertoptions menu to perform the following tasks:
- Connection info: opens the Connection info dialog that displays connection information.
- Go to schema: opens the underlying schema in the catalog explorer.
- Move to domain: opens a dialog that lets you select a domain to move the current data product to.
Click the data product’s card to view details .
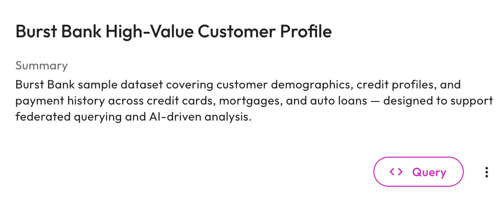
To switch to list view, click view_list.
In list view, click themore_vertoptions menu to perform the following tasks:
- Connection info: opens the Connection info dialog that displays connection information.
- Go to schema: opens the underlying schema in the catalog explorer.
- Move to domain: opens a dialog that lets you select a domain to move the current data product to.
Click the name of the data product to view details.

Use the Search data products text field to find data products by name or by the contents of their summaries.
Data product details #
The details pane of your data product is organized into Overview, Datasets, and Usage examples tabs, and includes an interactive header section.
Header section #
The header of the detail pane provides several controls for managing and interacting with the data product.
- Click bookmark to add the data product to your list of favorites. Bookmarked data products always appear at the top of the list of data products, even when other sorting and filtering options are used. When cloning a data product, bookmarks are not copied from the cloned data product.
- Click
 to open an AIDA chat.
 - Click the Enrich with AIDA button to enrich the data product.
- Click the Query button to query the underlying schema in the query editor.
Themore_vertoptions menu includes the following options:
- Connection info: opens the Connection info dialog that displays connection information.
- Go to schema: opens the catalog explorer where you can navigate to the underlying schema.
- Edit data product: allows the owner to edit the data product.
- Delete data product: allows the owner to delete the data product.
Overview #
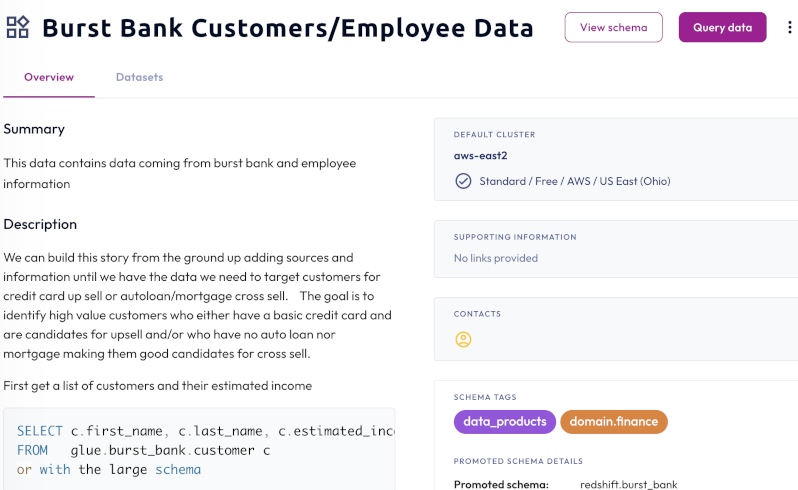
The Overview tab displays the Summary, Description, and Business rules provided for your data product. The tab includes the following details:
- Default cluster: lists the default cluster for the data product.
- Domain: the domain that the data product belongs to.
- Supporting information: lists relevant web links defined at creation of the data product, or imported from the underlying schema.
- Contacts: lists all users assigned as contacts defined at creation of the data product, or imported from the underlying schema.
- Schema tags: lists tags assigned to the underlying schema. Tags in data products are read-only.
- Promoted schema details: lists the following information about the
underlying schema:
- Promoted schema: the name of the underlying schema with the name of its catalog preceding it.
- Owner: the owning role for the underlying schema.
- Data products details: lists the following information about the data
product:
- Created on: the date the data product was created.
- Created by: the user who created the data product.
- Last updated on: the date the data product was last updated.
- Last updated by: the user who last updated the data product.
Datasets #
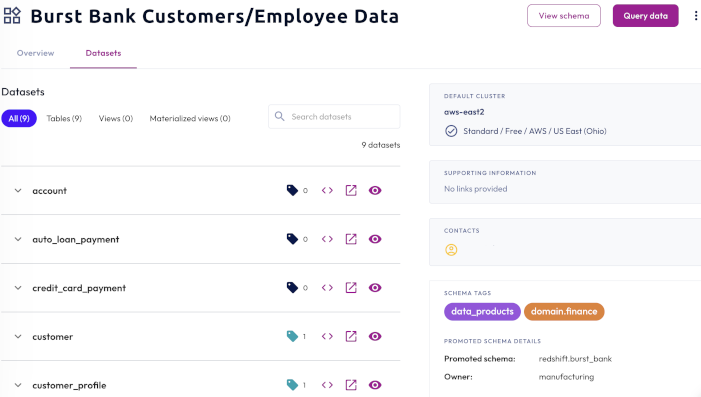
The Datasets tab displays all the datasets in the data product. Use the filters to view All datasets or to limit the list to show only Tables, Views, or Materialized views.
Expand each line item to view details, and use the interactive icons to perform the following actions:
- sell Displays the number of tags that are associated with the dataset. Hover to view tag names.
- code Opens the query editor where you can query the data.
- open_in_new Brings you to the table level in the catalog explorer.
- visibility Shows a preview of the dataset for tables. The result set is limited to 10.
Use the Search datasets field to find datasets by name.
Usage examples #
Use the Usage examples tab to provide use-case examples and code snippets that can help users understand and explore a data product.
To provide examples, click Add usage example to open a dialog.
- In the Usage examples details section, provide a meaningful name, description, and query example.
- In the Suggested prompt for AIDA section, you have the option to generate a prompt or write your own. Prompts appears in AIDA.
- Click Save.
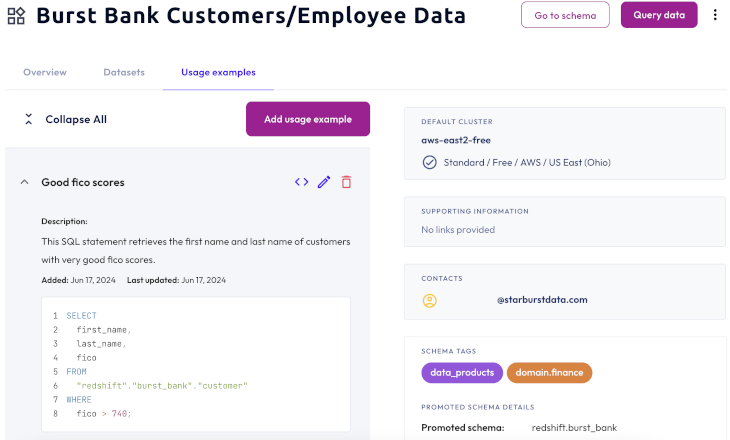
Usage examples are available in a collapsible list and contain information about the example, such as when the example was added and last updated.
Expand all examples at once or expand each usage example individually.
Details for all usage examples include the name of the example, the description provided, when the example was Added, and when the example was Last updated.
Use the interactive icons to perform the following actions:
- code Brings you to the query editor where you can query the data.
- edit Allows the owner to edit the usage example.
-
delete Allows the owner to delete the usage example.
Domains #
Roles that have the Create data domain account-level privilege can use the Domains tab to create domains, and then assign data products to them.
Grouping related data products into domains makes finding and managing them easier.
Create a domain #
Data products created using the DataProduct Service API are automatically
added to the Default domain.
To create a domain using the UI, click Create domain.
In the Create a domain dialog:
- Provide a Domain name and Description.
- Select an Owner and Contact from their respective drop-down menus.
- Click Create domain.
View domains #
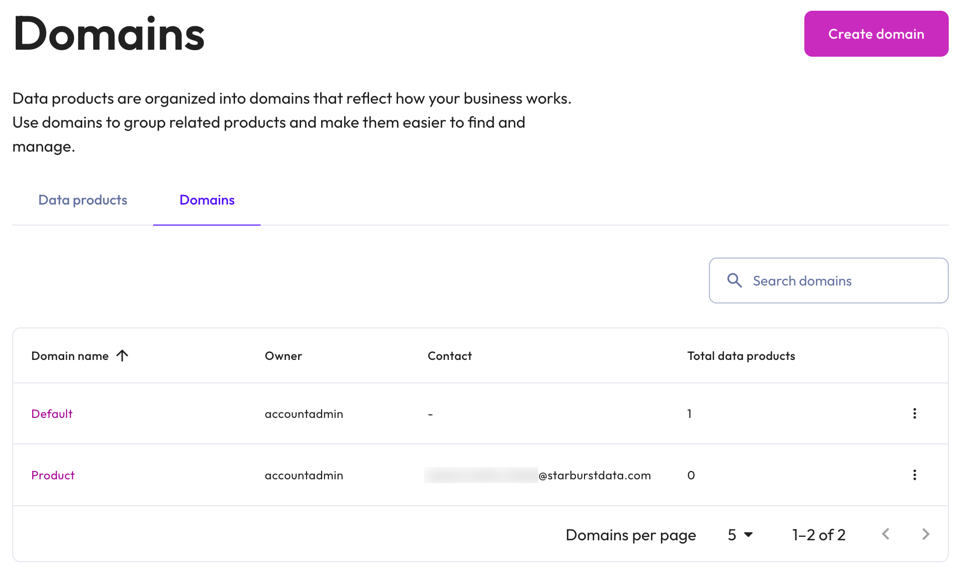
The Domains tab shows a list of domains with details organized in the following columns:
- Domain name: the name of the domain. Click the name to view domain details.
- Owner: the owning role.
- Contact: the users who can provide information and support for the domain.
- Total data products: the number of data products belonging to the domain.
By default, data products are grouped into the Default domain upon creation if no other domain exists or if no other domain is specified. Once created; however, you can move data products between domains.
Domain details #
To view domain details, click the domain name in the list on the Domain tab.
Domain details include Description, Owner,and Contact information, as well as any data products belonging to the domain.
Manage domains #
Manage domains from themore_vertoptions menu at the end of each row or from domain details.
Edit a domain #
To edit a domain:
- Click Edit.
- In the dialog, make edits in the desired fields.
- Click Save changes.
Move data products #
To move data products to a domain:
- Click Move data products.
- In the dialog, click Select All to move all data products to the specified domain at once or check the box beside one or more data products to move them individually or in batches.
- Click Move selected data products.
Delete a domain #
Deleting a domain also deletes all domain information. Subscribers also lose metadata created for this domain. The delete option is not available for the Default domain.
To delete a domain:
- Click Delete.
- In the dialog, type
DELETEto confirm the deletion. - Click Delete domain.
Is the information on this page helpful?
Yes
No