Okta SCIM setup #
System for Cross-domain Identity Management (SCIM) is a standard protocol for automating the exchange of user identity information between identity domains. Starburst Galaxy supports SCIM to allow an SSO identity provider to push user and group membership changes to Galaxy. Thus, Galaxy can accept an identity provider’s database of users and groups as its own.
Provision SCIM #
To complete the setup of Okta as the SSO identity provider for
Starburst Galaxy, follow the steps on this page. This procedure presumes you
have Starburst Galaxy open and logged in with accountadmin rights, and that
you have completed the steps on Okta SAML setup.
-
In Starburst Galaxy, go to the Access > Single sign-on pane, which is left unfinished at the end of the Okta SAML setup page and click Provision SCIM.
You might also land on the Single sign-on pane by clicking Provision SCIM on the Groups page.
-
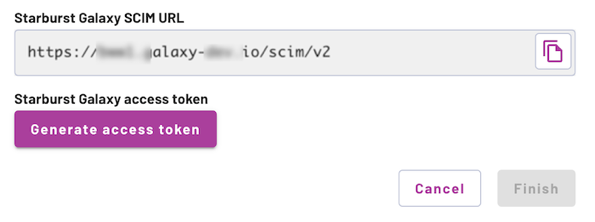
Click Generate access token.
Do not click Finish or navigate away from this pane yet!
You cannot restore this generated access token if you click Finish (but you can always create another token). During this procedure, make a safety copy of the token until you finish setting up the IdP side of SCIM.
-
In the Okta Admin console, click the menu menu and select Applications > Applications. In the list of apps, locate the app integration you created with the Okta SAML setup page, and click its name (which is likely to be “Starburst Galaxy”).
-
In the settings page for your app, open the first tab, General.
-
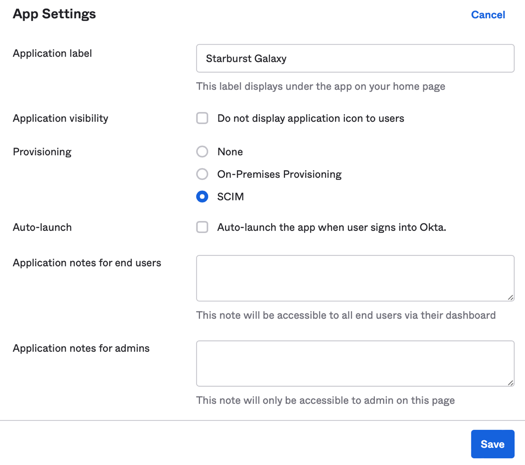
In the App Settings section, click the Edit link to allow making changes.
-
In the App Settings section, for the Provisioning option, select SCIM, then click Save.
-
This creates a new tab, Provisioning. Go to that tab and again click the Edit link.
-
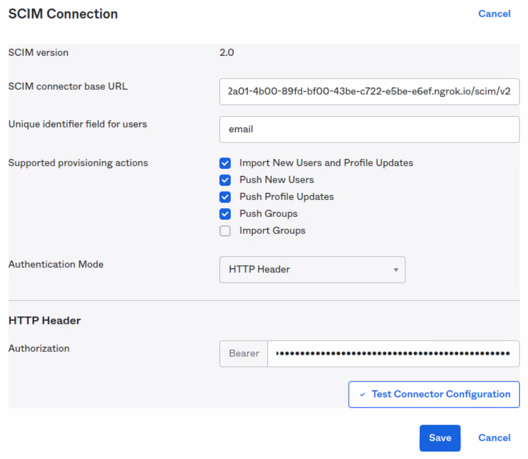
From Galaxy, copy the URL in the Starburst Galaxy SCIM URL field to SCIM connector base URL in Okta.
-
In the Unique identifier field for users, enter the literal string
email. This represents the field to be compared between Okta and Starburst Galaxy to identify usernames that match in both systems. -
Below the Unique identifier field, check the first four checkboxes. Leave the fifth checkbox blank.
-
In Okta, in the Authentication mode drop-down, select HTTP Header.
-
From Galaxy, copy the Starburst Galaxy access token to the Authorization - Bearer field in Okta.
-
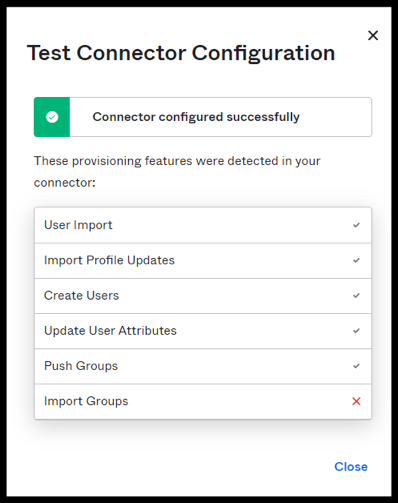
Click Test Connector Configuration.
-
On success, you receive a Connector configured successfully dialog showing the features tested.
-
Click Close, then Save.
Finish SCIM setup in Galaxy #
In the browser window holding Starburst Galaxy, the Provision SCIM pane is still open.
-
Click Finish.
-
Navigate to Access > Users and leave this browser window open. As provisioning proceeds from Okta, you can expect to see user names you authorized for Galaxy access in Okta to begin populating the Users list.
Set up provisioning from Okta #
-
After the Save at the end of the previous section, Okta takes a moment to set up the Starburst Galaxy app for SAML and SCIM as specified.
-
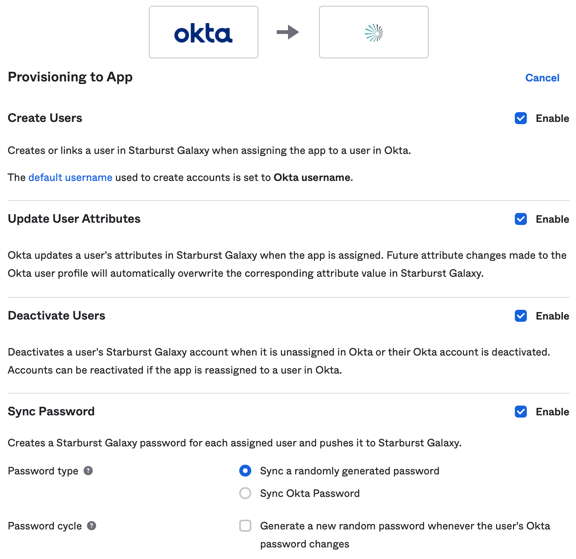
When done, the Provisioning tab for the app changes to a Settings view. Make sure To App is selected on the left and that the image at the top of the pane shows the Okta to app direction. If you uploaded an image for your app, that appears in the app rectangle.

-
Click Edit to enable changes.
-
Select the first three Enable checkboxes, which are required.
-
The fourth checkbox is optional but strongly recommended.
-
With the fourth checkbox selected, select Sync a randomly generated password.
-
The Attribute Mappings section can be used to adjust which Okta attributes are sent to Starburst Galaxy and how they map to SCIM fields. Note that Starburst Galaxy supports a subset of SCIM fields and ignores any unsupported fields. For a list of supported fields, see SCIM support.
-
Scroll down and click Save.
Okta is now configured to push assigned usernames to Galaxy.
Grant Okta user access #
To test login access from Okta right away, you must assign your current Okta login name to the app. To do this:
-
In Okta’s settings page for your Starburst Galaxy app, open the Assignments tab.
-
Click the Assign menu’s drop-down, and select Assign to People.
-
A dialog displays that should contain at least your current Okta login name, and may contain many names, depending on your Okta usage.
-
Locate your current Okta login name, select it, and click Assign.
Login test from Galaxy #
Do not test logging in to Galaxy with an Okta user name until:
- You see in Galaxy that the Access > Users list shows user names provisioned from Okta.
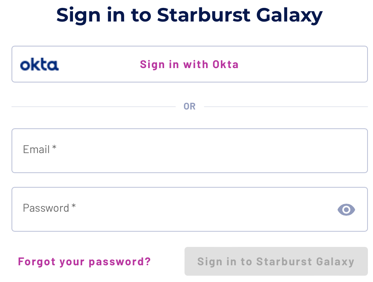
When this condition is met, log out of Starburst Galaxy and try to log back in. On the login page, you now have an Okta option for signing in.
Click the Okta button and log in to Okta with the username you assigned to the Galaxy app in Grant Okta user access. This opens Galaxy without further password prompts.
Logging in with a previously configured, non-Okta email name and password is still available and still valid despite the availability of Okta-provisioned logins. You can eventually reduce the number of direct-configured email name logins to a few trusted administrative names.
Login test from Okta #
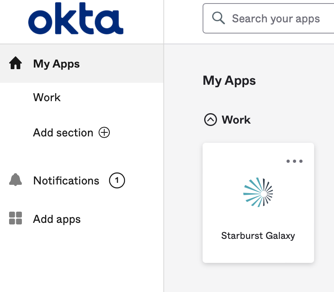
Log into Okta normally using the Okta username you assigned to the Starburst Galaxy app. On Okta’s usual dashboard of app icons, look for the app you added for Starburst Galaxy.
You can now double-click that app icon to start Starburst Galaxy without further login prompts.
Username provisioning #
Okta is now configured to push down to Galaxy any usernames assigned in Okta to the Starburst Galaxy app.
Assign further usernames to the app in Okta, using the same steps as in Grant Okta user access. Then keep an eye on the Access control > Users list in Galaxy. After some time, the usernames you added appear in Galaxy’s list of valid users. Those users now have the Galaxy app icon in their Okta dashboards.
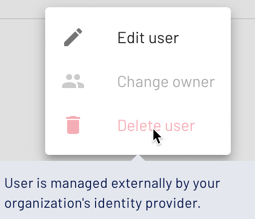
To distinguish an Okta-provisioned username from a direct-entered one, click the more_vert menu for that name. An Okta-provisioned name has the last two options dimmed, and shows a usage note if you hover over either of those options.
Okta group considerations #
You can organize your usernames into groups that you create in Okta. If you then assign the group as a valid user of Galaxy, you are assigning all members of that group as well — but not the group itself.
When SSO configuration is complete, go to Galaxy’s navigation menu and select Access > Groups. The Groups tab now shows the following text:
Groups are managed externally by your organization's identity provider.
You might see a single group on the Groups pane, Galaxy Test Group. If you have assigned any Okta groups to the Starburst Galaxy app, those group names begin to populate the Groups pane.
Group names must be registered in the Push Groups tab in order for Okta to push the group itself to Galaxy. Think of this tab as if named Groups to push. Actually pushing the groups is as automated as pushing usernames, but Okta needs to know which ones to push.
The following points summarize how groups differ from usernames:
-
Users and groups get pushed separately.
-
You can sync and push users individually or as part of a group. (This can be confusing).
-
When syncing and pushing users by group, the group itself does not get pushed.
-
Users that you want to sync and push to Galaxy must be specified on the Assignments tab.
-
Groups that you want to sync and push to Galaxy must be specified on the Push Groups tab.
Is the information on this page helpful?
Yes
No