ClickHouse catalogs #
You can use a ClickHouse catalog to configure access to a ClickHouse database.
Follow these steps to create a catalog for ClickHouse:
- In the navigation menu, select Data, then Catalogs.
- Click Create catalog.
- On the Create a catalog pane, click the ClickHouse icon.

- Configure the catalog as prompted in the dialog.
- Test the connection.
- Connect the catalog.
- Set any required permissions.
- Add the new catalog to a cluster.
The following sections provide more detail for creating ClickHouse catalog connections.
Select a cloud provider #
The Cloud provider configuration is necessary to allow Starburst Galaxy to correctly match catalogs and clusters.
The data source configured in a catalog, and the cluster must operate in the same cloud provider and region for performance and cost reasons.

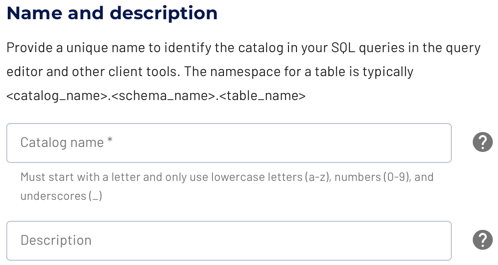
Define catalog name and description #
The Catalog name is visible in the query editor and other clients. It is used to identify the catalog when writing SQL or showing the catalog and its nested schemas and tables in client applications.
The name is displayed in the query editor, and in the output of a SHOW
CATALOGS command.
It is used to fully qualify the name of any table in SQL queries following the
catalogname.schemaname.tablename syntax. For example, you can run the
following query in the sample cluster without first setting the catalog or
schema context: SELECT * FROM tpch.sf1.nation;.
The Description is a short, optional paragraph that provides further details about the catalog. It appears in the Starburst Galaxy user interface and can help other users determine what data can be accessed with the catalog.
Multiple connections #
The ClickHouse catalog can only access a single ClickHouse database within a single catalog. If you have multiple ClickHouse databases, or want to connect to multiple ClickHouse instances, you must configure additional instances of the ClickHouse catalog.
Configure the connection #
Read further to learn about each supported connection method. The following sections detail the setup for the supported cloud providers.
-
Connect directly
The connection to the database requires a username, password authentication, and the details necessary to connect to the database server, typically hostname or IP address and port. -
Connect via SSH tunnel
A connection to the database can be established directly, if the Starburst Galaxy IP range/CIDR is allowed to connect.If the database is only accessible inside the virtual private cloud (VPC) of the cloud provider, you can use an SSH tunnel with a bastion host in the VPC.
ClickHouse connection #
To connect to your ClickHouse cluster directly, you must provide the following details:
- ClickHouse host: Hostname or IP address of the ClickHouse server or cluster.
- Port: Port used by the ClickHouse host.
- Username: Username to connect to the ClickHouse host.
- Password: Password to connect to the ClickHouse host.
- toggle_on Use TLS: Encrypts traffic in transit between Galaxy and ClickHouse. Defaults to off.
Test the connection #
Once you have configured the connection details, click Test connection to confirm data access is working. If the test is successful, you can save the catalog.
If the test fails, look over your entries in the configuration fields, correct any errors, and try again. If the test continues to fail, Galaxy provides diagnostic information that you can use to fix the data source configuration in the cloud provider system.
Connect catalog #
Click Connect catalog, and proceed to set permissions where you can grant access to certain roles.
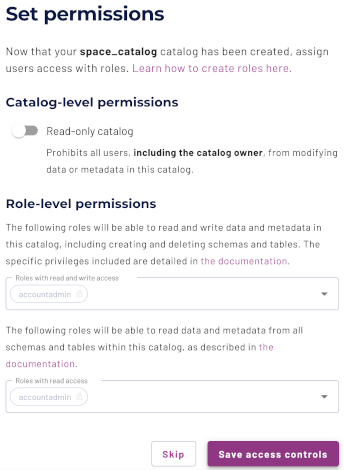
Set permissions #
This optional step allows you to configure read-only access or full read and write access to the catalog.
Use the following steps to assign read-only access to all roles:
- Select the Read-only catalog switch to grant a set of roles read-only access to the catalog’s schemas, tables, and views.
- Next, use the drop-down menu in the Role-level permissions section to specify the roles that have read-only access.
- Click Save access controls.
You can specify read-only access and read-write access separately for different sets of roles. That is, one set of roles can get full read and write access to all schemas, tables, and views in the catalog, while another set of roles gets read-only access.
Use the following steps to assign read/write access to some or all roles:
- Leave the Read-only catalog switch cleared.
- In the Role-level permissions section:
- Expand the drop-down menu in the Roles with read and write access field and select one or more roles to grant read and write access to.
- Expand the drop-down menu in the Roles with read access field and select one or more roles from the list to grant read-only access to.
- Click Save access controls.
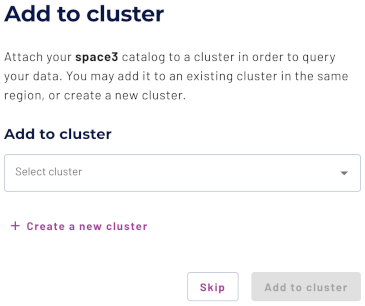
Add to cluster #
You can add your catalog to a cluster later by editing a cluster. Click Skip to proceed to the catalogs page.
Use the following steps to add your catalog to an existing cluster or create a new cluster in the same cloud region:
- In the Add to cluster section, expand the menu in the Select cluster field.
- Select one or more existing clusters from the drop down menu.
- Click Create a new cluster to create a new cluster in the same region, and add it to the cluster selection menu.
-
Click Add to cluster to view your new catalog’s configuration.
SQL support #
The catalog provides read access and write access to data and metadata in the ClickHouse database. It supports the following features:
- Globally available statements
- Read operations
- Write operations:
- Data Management:
Is the information on this page helpful?
Yes
No