External security in Azure #
You must configure sufficient permissions to allow Starburst Galaxy to access your data sources in Azure. The details depend on the connected data source.
The following sections detail the different methods, and explain the necessary steps to configure security and permissions in Azure. You can then use the resulting IDs in your catalog configuration in Starburst Galaxy.
Make sure that both your Azure account and your Azure login name’s role have sufficient permissions to allow creation of either a service principal or an access key.
Azure service principal #
In Azure, an application service principal is a service account that can represent an application for purposes of authenticating access rights. In the case of Starburst Galaxy, the application represented is Microsoft’s own Entra ID system, as configured to hold access rights on behalf of Galaxy end users.
Register an application #
Create an Azure service principal for an Azure object storage account with the following steps.
-
Sign in to your Azure account through the Azure portal.
-
In Azure services, select Microsoft Entra ID.
-
In the left-side menu, select Manage > App registrations.
-
From the top menu, select New registration.
-
On the Register an application page:
a. Specify a name for this app registration.
b. Select the top radio button: Accounts in this organizational directory only
c. In the Redirect URI section, select Web from the drop-down, but do not specify a URL.
-
Click Register. This creates an Azure AD application and service principal.
Assign roles and members #
Next, assign a role to the service principal just created.
-
In the Azure portal’s home page, select All Services and scroll down to General.
-
Click Subscriptions.
-
In the list of subscriptions, click the link for the appropriate subscription to be billed for access with this app registration.
-
In the left-side menu, select Access control (IAM).
-
Select Add > Add role assignment.
-
Click Privileged administrator roles.
-
Select one or more access roles for Starburst Galaxy to have for the object storage account being configured. “Contributor” is a reasonable option for Starburst Galaxy.
-
Click Next.
-
In the Members tab, make sure the Assign access to control specifies User, group, or service principal.
-
Click Select members. Select one or more names of people with access to this Azure account who are to be granted the chosen role.
-
Click Review and assign twice.
View generated ID numbers #
You can now obtain the generated ID numbers for this service principal:
-
Return to the Azure portal’s home screen.
-
Select Microsoft Entra ID.
-
In the left-side menu, select App registrations.
-
Click the name of your newly created service principal.
-
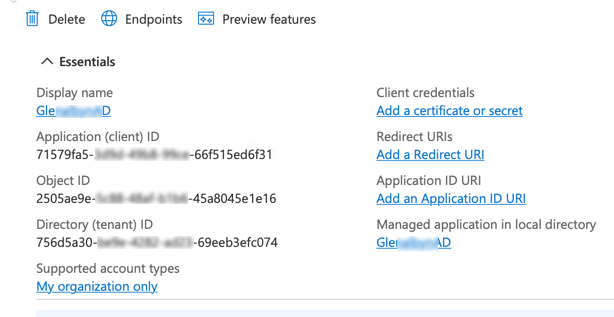
At the top of your application’s page, there is an Essentials section that contains several ID numbers. Keep this open while you go to the Cloud settings for Azure page. On that page, save this service principal in Starburst Galaxy with an alias. This lets you use the same service principal to authenticate multiple object storage accounts.
Azure access key #
The process of selecting roles and memberships as part of the creation of a service principal can be daunting. There is an alternative authentication method that is not as secure, and does not provide fine-grained access control, but can be easier to use. The alternate method is to use the storage account’s access key.
View the access key #
View your storage account’s access key with the following steps:
-
Sign in to your Azure account through the Azure portal.
-
In Azure services, select Storage accounts.
-
Click the name of the storage account of interest.
-
In the left-side menu, select Access keys.
-
In the top menu, click Show keys. The result is a screen much like the following image.
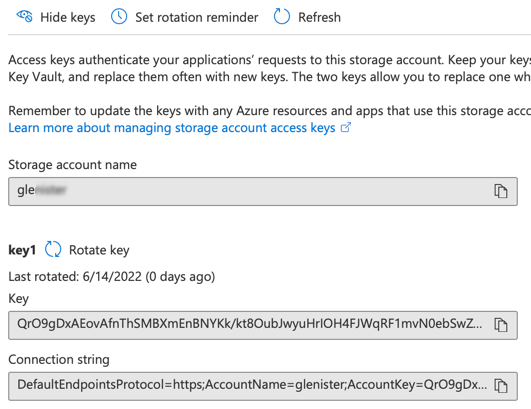
-
Only use key 1. Select the entire Key value and copy it.
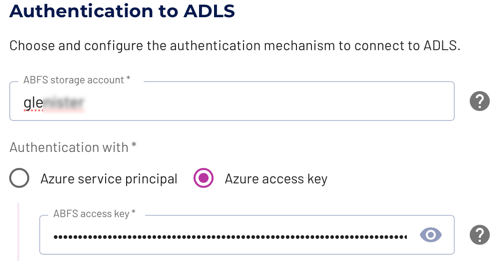
Specify the key for an ADLS catalog #
When setting up an ADLS catalog, in the Authentication to ADLS section, select Azure access key.
Paste the key you copied in step 6 into the ABFS access key field, and continue filling in the form.
At the end, click Test connection to validate your access to the specified ABFS storage account with this access key.
Is the information on this page helpful?
Yes
No