Column masks #
Starburst Galaxy’s column masks let you control how a column’s value is displayed to affected users. A column mask can be added to a policy. Column masks are created from the Column masks pane.
See Column masks for further details.
Column masks pane #
Use the Column masks pane to view the list of column masks and their properties, as well as to create, edit, and delete column masks.
The Column masks navigation menu link is only visible to users whose active
role set includes the Manage security account
privilege.
View column masks #
The Column masks pane lets you view a list of your column masks including useful information such a description, use count, and ownership.
Use the Search column masks field to find column masks that match your
search term. For example, you can search accountadmin to find column masks
owned by the accountadmin role.

The following columns are displayed:
- Column mask name: The name given to the column mask.
- Column mask type: The data type selected for the column mask.
- Column mask expression: The expression that describes how a column’s value should be displayed to the affected users.
- Use count: The number of times the column mask is in use.
- Description The description given to the column mask.
- Owning role: The role that owns the filter.
- Created: The timestamp when the filter was created.
- Last updated: The timestamp when the filter was last updated.
To reorder the column mask view, click a column name to sort by that column. Click the column name again to reverse the sort order.
Create column masks #
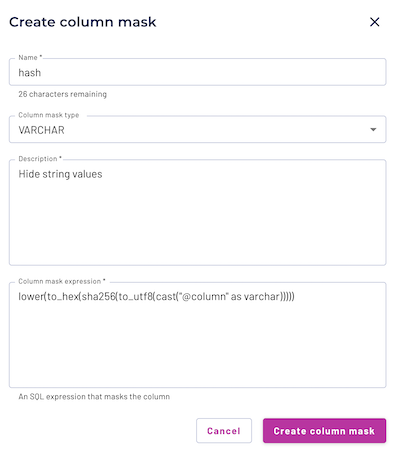
To create a column mask:
- Click Create column mask.
- In the dialog, enter a name in he Name field.
- Use the Column mask type menu to select the data type.
VARCHARis selected by default. - Enter a description for the column mask in the Description field.
-
Enter an expression in the Column mask expression field. This expression is the output that appears to users when the mask is applied, written as a regular expression. You can write a string in double quotes such as
"String
  contents"
to mask all values as that string, or you can write a statement using@columnto extract the value and wrap it in a series of functions and operators to customize the output that appears to the user.For example, a column mask expression to hide string values with a
SHA-256hash can be done using the following expression:lower(to_hex(sha256(to_utf8(cast("@column" as varchar))))) - Click Create column mask.
BIGINT type column that uses
functions to produce a TEXT value is invalid and causes the query to fail.Edit column masks #
To edit an existing column mask:
- Click the more_vert options menu on the column masks list.
- Select Edit column mask settings.
- Make your changes to the Name, Column mask type, Description, and Column mask expression fields.
- Click Save column mask.
To change the column mask’s owner:
- Click the more_vert options menu on the column masks list.
- Select Change owner.
- Select a new owner in the New owner drop-down menu.
- Click Change owner.
- Click Change in the confirmation dialog.
Delete column masks #
To delete a column mask:
- Click the more_vert options menu on the column masks list.
- Click Delete column mask.
- Click Yes, delete in the confirmation window.
Apply column masks to policies #
Column masks are applied to policies upon policy creation or when editing a policy.
See Creating policies for more information.
Is the information on this page helpful?
Yes
No