Manage users, roles, and tags #
The following topics cover managing users, roles, and tags in your Galaxy clusters:
- Account and cluster privileges
- Create and use attribute tags
- Automatic data classification
- Roles and privileges
- Managing users without SSO
Roles and privileges pane #
Use the Roles and privileges pane to view the list of roles and the properties for each role, as well as to assign users, groups, other roles, and privileges to a role.
Any user can see the list of all roles without requiring an assigned privilege.
List of roles #
The Roles and privileges pane displays a list of all roles. A role has a collection of privileges. Users are assigned to one or more roles.
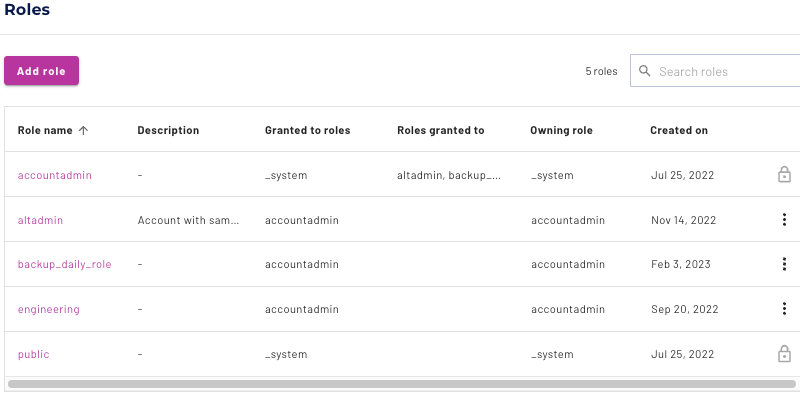
The following table describes the columns in the list of roles.
| Column | Description |
|---|---|
| Role name | Role names must be between 1 and 64 characters, and may contain only lowercase Latin characters (a-z), numbers (0-9), and underscores. |
| Description | A role description is optional, and may contain upper and lowercase Unicode characters, including emojis. |
| Granted to roles | When creating a role with the Add a new role dialog, participation in the new role can be assigned by selecting the Grant to the creating role? checkbox. If this checkbox is cleared, this column is empty, and any roles must be granted later. |
| Roles granted to | One role and its privileges can be assigned to another role. This allows you to build a hierarchy of privilege sets that are gathered into containing roles. For example, a low-level role edit_abc can be configured to grant only edit rights for a single table, abc, while another role edit_xyz grants rights to edit table xyz. Now both edit_abc and edit_xyz can be granted to the engineering role. As a result, any user with the engineering role has access to both tables. |
| Owning role | The owning role is the creating role, unless ownership is reassigned with the options menu. |
| Created on | This is the date the role was created. The date cannot be edited. |
| (last column) | The last column shows either an more_vert options menu icon or a lock lock icon. The lock designates roles that are not editable; it is present for the public role and for the current role. |
Options menu #
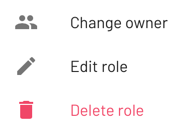
Click the more_vert options menu to show the options for that role. The current role’s active role set must own the target role or have the MANAGE SECURITY privilege to modify a role using the options menu.
-
Change owner. Every role has an owning role. By default, this is the creating role, unless the owning role is changed with this menu option. The owning role can be changed by any role with the MANAGE SECURITY privilege.
-
Edit role. Use this option to change the name or description for the selected role.
-
Delete role. Use this option to remove the selected role from the current Starburst Galaxy account. Predefined roles cannot be deleted.
Add a role #
Use the Add role button to create additional roles. This button is dimmed unless the current role has the CREATE ROLE privilege for this Starburst Galaxy account.
A new role consists only of a name and optional description. Once created, it is displayed in the list of roles, and you can proceed to assign users and add privileges to the new role.
The Add a new role dialog has a single checkbox, Grant to the creating role, which is used as follows:
- Select this checkbox to assign the new role to the creating role.
- Leave this checkbox cleared to create an empty role that you can grant to other roles later.
Delete a role #
Use the Options menu to delete a role. If the target role is assigned other roles, that relationship is also deleted. To delete a role, your current role must either own the target role or have the MANAGE SECURITY privilege.
Role properties #
Click a role’s name in the list of roles to
see a pane showing the properties of that role. To view a role’s properties,
your current role must either own the target role, have the MANAGE
SECURITY privilege, or
have any privileges with the GRANT
option.
The properties pane has three or four tabs, depending on your Galaxy account’s SSO groups configuration.


To return to the list of roles, use the Back link in the upper right.
Users tab #
The current user must have the MANAGE SECURITY privilege to be able to assign or unassign users to or from roles.
If users have been assigned to the current role, the Users tab shows the list of those usernames by email address, which can be sorted A-Z or Z-A. A message shows if no users are assigned.
In either case, the Assign user button opens a dialog from which you select a name from a drop-down list of the users registered for this Starburst Galaxy account. Click the Unassign link for a username to remove that name from assignment to this role.
Roles tab #
To view and modify a subordinate role, the current role must either own the role or have the MANAGE SECURITY privilege.
If subordinate roles have been assigned to the current role, the Roles tab shows a list of those role names. The Revoke button allows you to remove the selected subordinate role from the current role. If no subordinate roles are assigned, a message displays.
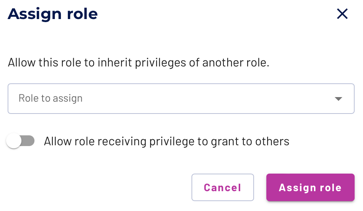
Use the Assign role button to open the dialog of that name. Select a role name from the drop-down list of roles, then click Assign role. The Allow role receiving privilege checkbox is not active for this dialog.
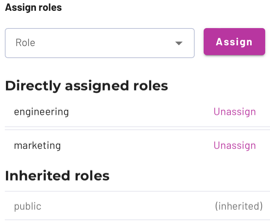
You can also assign and unassign roles in the Access control > Users list. The edit pane for a username shows the directly assigned roles and inherited roles in separate lists.
Groups tab #
The current user must have the MANAGE SECURITY privilege to be able to assign or unassign roles to or from groups. The MANAGE SINGLE SIGN ON privilege is also required if you need to complete SSO configuration for this Starburst Galaxy account.
Groups are not a native concept in Starburst Galaxy, but are provided by an external identity provider (IdP) that supports the SCIM protocol.
The Groups tab is present in the role properties pane if the Access control > Groups pane is also present. That occurs under the following conditions:
- Your Starburst Galaxy account is provisioned to support single sign-on authentication from an IdP.
- Your IdP supports SCIM.
- SCIM is configured and running. Group names are downloaded automatically from your IdP to the Groups pane.
This creates three cases for the Groups tab.
-
No Groups tab: Your Galaxy account is configured to support SSO from an IdP that does not support SCIM. Access control > Groups is also missing.
-
Groups tab with Provision SCIM message: Either your Galaxy account is not configured to support SSO, or is configured to support SSO from an IdP that supports SCIM, but SCIM has not been configured. In these cases, the Provision SCIM button takes you to the Configure single sign-on pane to begin or continue setting up SSO.
-
SSO with SCIM is configured and working: and group names are available, as populated from your IdP. If group names have been assigned to the current role, they are listed in the Groups tab. If not, click the Assign Groups button to assign the privileges of one or more groups to the current role.
See SSO groups for further information.
Privileges tab #
To view or modify privileges assigned to the current role, the current user must
have the MANAGE SECURITY
privilege or have any privileges the
GRANT option.
-
View privileges
Select the Privileges tab to view the current role’s privileges. Privileges are shown for the active role set of the current role.
Optionally click Only directly assigned privileges to view only the privileges directly granted to the current role, without inherited privileges from a related role.

The role’s privilege set is shown in a grid with collapsible rows, each row showing the count of the granted privileges for an entity. Click an entity row to see the privileges granted to the current role for that entity. For some entities, continue clicking sub-rows to see the full set.
Granted privileges show with a green Allow check mark. Granted privileges with the ability to grant to other roles are shown with a blue Allow and grant to others check mark, while denied privileges show with a red Deny symbol.

-
Add privileges
The Add privilege button opens the Add privilege pane where you can grant or deny the current role any combination of privileges from the Account level down to a single column of a table.
See the Security > Privileges page for further information on each entity’s assignable privileges.
-
Deny privileges
Pay special attention to Wildcard privileges and Deny a privilege sections to understand that it is rarely appropriate to assign the Deny privilege.
-
Modify grants
When viewing a role’s privileges, look for the more_vert options menu on the right side of a row of assigned privileges. Click to show the Modify grants dialog, which is specific to that row’s privileges. Select the slider for one or more privileges to enable or disable grant options for an assigned privilege.
-
Revoke privileges
When viewing a role’s privileges, look for the more_vert options menu on the right side of a row of assigned privileges. Click to show the Revoke privileges dialog, which is specific to that row’s privileges. Select the checkbox for one or more privileges to revoke an assigned privilege.
Policies tab #
Use the Policies tab to view the current role’s policies in a table with the policy name, a description, the scope of the policy, the role that owns the policy, and the timestamp of creation.
The Policies tab is only visible if a role in the user’s active role set has the account-level privilege MANAGE_SECURITY.
For information about creating a policy, see Manage data access > Creating policies.
Owned entities tab #
Use the Owned entities tab to view a list of entities owned by the selected role.
The list contains a toggle switch that is enabled by default:
- Only directly owned entities: excludes entities inherited from a parent role. Disable this switch to include entities inherited from a parent role in the list.
A filter bar at the top of the list allows you to quickly find entities:
- Name filter: Enter text to filter entities by name. Regex patterns are supported for advanced filtering by enabling the toggle.
- Entity kind dropdown (required): Select an entity kind from the dropdown
to show only entities of that type.
- If the selected entity kind is SCHEMA or TABLE, a Catalog dropdown (required) appears to further filter entities by catalog.
- If the selected entity kind is TABLE, a Schema name text field (required) appears to filter by schema name.
In the first column of the list, select the checkbox next to one or more entities to perform the following actions:
- Delete: delete one or more entities
- Change owners: change the owner of one or more entities to a different role
As an alternative, the end of each row features an more_vert options menu that includes Delete and Change owner actions.
The list shows the following information about each entity:
- Entity kind: the type of entity
- Entity: the name or URI of the entity
- Owning role: the parent role that owns the entity
- Created on: the date the entity was created
- Last modified: the date the entity was last edited
Tags #
Starburst Galaxy allows users to associate attribute tags with one or more catalogs, schemas, tables, views, or columns. Tags can be combined with attribute-based access control policies to ensure that each role has the appropriate access rights to perform actions on entities in the system.
Is the information on this page helpful?
Yes
No