Run queries #
The query editor offers a full environment to write and execute SQL statements. You can access all running clusters and their configured catalogs.
Edit, generate, and explain queries #
Access the query editor by clicking Query editor from the Query option of the navigation menu.
As an alternative, select Query from the options menu in the list of clusters.
Run a SQL query #
Execute a query in one of three ways:
- Click the ▶ Run button
- Press Ctrl+Enter (⌘+Enter on Mac)
- Invoke the context menu and select Run query
If your Starburst Galaxy session has more than one cluster defined, you must specify which cluster to apply the Run operation to. The ▶ Run button does not become active until you select the active cluster using the location drop-down menus.
Run options #
There are three variations of the Run button.
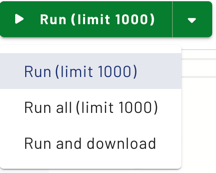
The last variation you used remains active for the current tab, with each tab maintaining separate history of the state of the Run button. Use the drop-down arrow in the current Run button to select among the Run options, which are:
-
▶ Run (limit 1000): This default option retrieves up to 1000 rows of the query’s result set and places it in the results pane. Result sets longer than 1000 rows are truncated as if
LIMIT 1000was appended to the query. You can use the Download link at the top of the results pane to download a CSV file of this truncated result set as long as it is still visible in the results pane. -
▶ Run all (limit 1000): This option applies when the current tab has more than one valid SQL statement, each terminated by a semicolon. In this case, this option runs all statements in order, top to bottom, as described in Run multiple statements. The same 1000 row limit applies to this option.
-
▶ Run and download: This option retrieves a query’s entire result set and streams it in CSV format to a file in the current user’s default downloads directory. Use this option when you expect a large result set from a query. The amount of data that can be downloaded with this option is browser-dependent. Use a different client to download very large result sets. The name of the results file is browser dependent. Chrome prompts for a filename; Firefox and Safari write to a file named
results.csv, appending a digit or a timestamp if the target filename exists. While the download proceeds, a few rows of sample results appear in the results pane.
Query selection #
There are two ways to specify which query to run, if you have multiple SQL statements in a tab.
-
Click to select: Click to place the cursor anywhere in a complete SQL statement that terminates with a semicolon, then invoke one of the Run methods.
-
Highlight to select: Highlight a complete SQL statement or valid portion of a statement, then invoke one of the Run methods. You can also highlight to select more than one complete SQL statement and run them all in sequence.
The click-to-select option is strict about requiring a terminating semicolon for statements. A statement with a missing semicolon prevents running that statement and statements below it in the same tab.
When you use a pop up options menu to place a SQL statement on the canvas, the statement is highlighted. Highlight-to-select is more forgiving of semicolon placement.
When text is selected, the Run button options change into:
- ▶ Run selected (limit 1000)
- ▶ Run all selected (limit 1000)
- ▶ Run and download selected
Run multiple statements #
You can run more than one SQL statement in sequence in the following ways:
- Use highlight to select the statements of interest, followed by one of the Run options.
- Use the Run all (limit 1000) option to run all SQL statements in the current tab in sequence.
In either case, the statements are run in top down order, with the results of each statement showing in sequence in the results pane. A navigation sub-pane opens in the results pane to show the status of each selected query. Click to select a row in this sub-pane to show the corresponding results from each SQL statement.
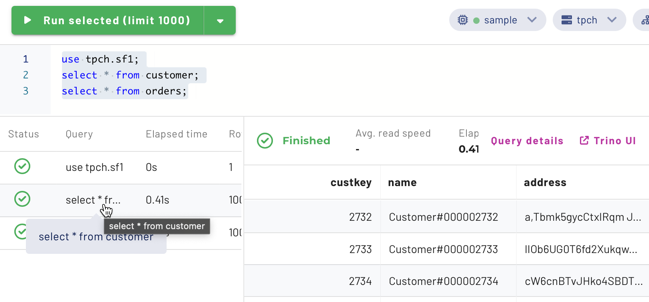
If you click Cancel while a multiple statement set is running, the cancellation applies to the currently running statement. The execution of all following statements in the set is stopped, with status showing Skipped.

Generate SQL from text #
This feature generates SQL statements using natural language statements. To access this feature, select Generate SQL for this data from the ( ) options menu on the right of a schema, table, or view’s name in the cluster explorer pane of the query editor. This opens the Generate SQL from text panel, with the selected schema, table, or view entered for you in the Scope field.
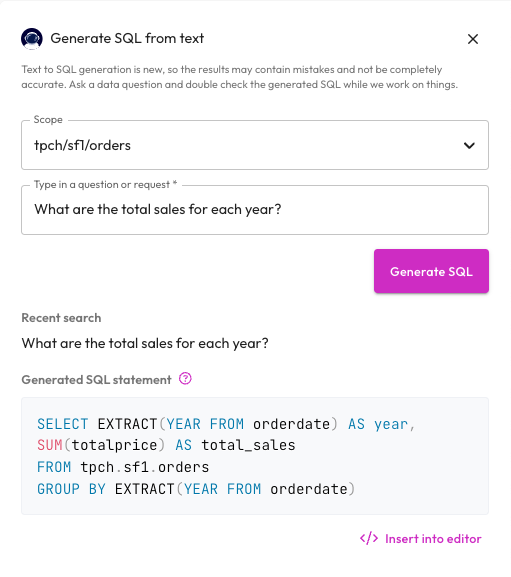
Use the Scope drop-down menu to choose a different schema, table, or view for your query.
Type a question or request in plain text about the schema, table, or view. Then click the Generate SQL button to create a matching SQL statement. Click Insert into editor to paste the generated SQL statement into the query editor.
The Generate SQL from text feature uses OpenAI’s GPT-4 technology. OpenAI’s technology is not invoked unless you select this menu option. For more information, see the OpenAI documentation.
Query explanation #
The Query explanation feature provides a plain text explanation of a SQL query. To access this feature, highlight a SQL query or a portion of one, then right-click and select Explain query from the context menu. This opens the Query explanation panel.
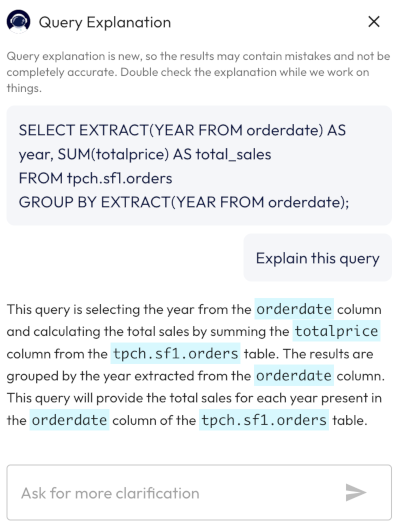
After receiving the initial explanation, tou can continue to ask for further explanations by entering another question in the Ask for more clarification field.
The Query explanation feature uses OpenAI’s GPT-4 technology. OpenAI’s technology is not invoked unless you select this menu option. For more information, see the OpenAI documentation.
Editor pane #
Use the current tab in the editor pane to enter, edit, then execute one or more SQL queries. You can overwrite the contents of the current tab or click the button at the end of the tab row to open a new tab to start fresh.
Auto-completion #
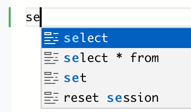
The query editor anticipates SQL commands, most function names, and names of
your schemas, tables, views, materialized views, and columns as you type, and
presents a dialog that suggests several ways to complete the command or function
you started. Select an option and press the Tab key to accept one of the
options, or keep typing to close the dialog.
Location drop-down menus #
The left hand corner above the editor pane contains drop-down selectors that let you specify the default cluster, catalog, and schema for queries in the current editor tab. These settings persist for each tab separately, and are restored when you reopen a saved query.
If you have more than one cluster in your Starburst Galaxy account, you must specify the active cluster before the Run button becomes active. When you open a new tab, cluster selection is empty and a message reminds you to select a cluster before querying.
A green dot in the cluster drop-down means the cluster is currently running. Selecting a stopped cluster in the drop-down starts the cluster.
Making these UI selections for catalog and schema is analogous to entering the
USE command in a SQL client session. If you do specify an actual USE
catalog.schema statement as an editor command, the specified catalog and schema
display as current selections in these drop-down menus. However, there is no
support for specifying a cluster with a USE command.

Editor pane options menu #
To the right of the Run button is an ( ) options menu that shows the following options:
- Show SQL docs opens a pane containing the Starburst Galaxy SQL documentation.
- Copy: copies the current editor selection to the clipboard.
- Prettify and Command palette: as described next in Context menu.
Context menu #
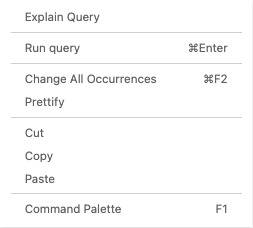
The query editor canvas shows a context menu invoked in the standard ways: right-click on a right-hand configured mouse, double tap on a trackpad, and so on. The context menu provides:
- Explain query: to open the Query explanation pane containing an explanation of the currently selected query or part of a query.
- Run query: to execute the query that contains the cursor, or execute the fully selected query, or execute the set of fully selected queries.
- Change All Occurrences: to search and replace a string in a long query being edited.
- Prettify: to format the selected query to add spaces, tabs, and newlines where needed.
- Cut, Copy, Paste: editing commands.
-
Command palette: opens a dialog from which you can select editing commands to run at the current cursor location or run on the current editor selection. With the cursor in the editor pane, you can also press F1 to open the command palette. Press Esc to close the palette.
Query status #
Some statuses are only visible when the query editor is running. Other query statuses are only visible in the query details page. The query editor statuses include:
- Cancelling: The status that displays after a user clicks the Cancel button. Only visible in the query editor.
- Failed: Query execution has failed.
- Finished: The query is finished executing and all output was consumed.
- Queued: The query is waiting for other queries to execute.
- Skipped: The query was run as part of a set of queries, but an earlier query in the set was cancelled.
- Running: The query is executing and has at least one running task.
- Starting server: The query processing is waiting for the cluster to complete starting from a suspended state.
Is the information on this page helpful?
Yes
No