Configuration #
The Starburst ODBC driver V3 series is described in the following pages:
- Overview
- Installation
- This page — Configuration
- Upgrading and rolling back
This page provides instructions for creating and configuring a data source name (DSN) using the Starburst ODBC driver V3 series.
Before you continue, you must install the driver.
Create a data source name #
To create a data source name (DSN):
- From the Windows Start menu, search for ODBC Data Sources and select
either ODBC Data Sources (64-bit) or ODBC Data Sources (32-bit).
- Use the ODBC Data Source Administrator that matches your application’s bitness. Verify the bitness by checking the title bar.
-
In the ODBC Data Source Administrator:
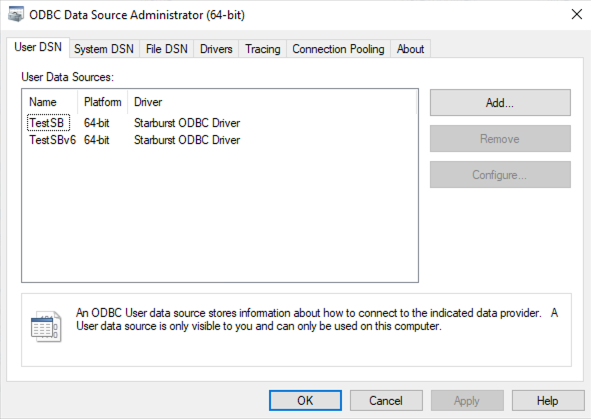
- Click the Drivers tab. Confirm that Starburst ODBC Driver appears in the list.
- Choose either:
- User DSN tab (for a DSN only the current Windows user can access)
- System DSN tab (for a DSN all users on this machine can access)
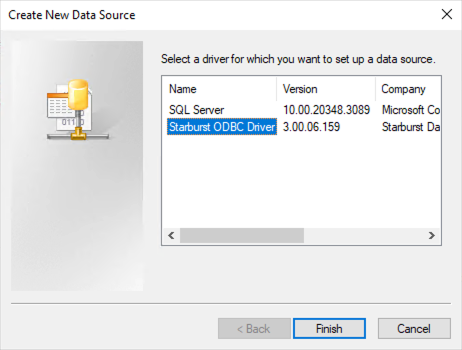
- Click Add.
- In the Create New Data Source dialog, select Starburst ODBC Driver.
- Click Finish.
Connection settings #
In the ODBC Starburst Setup dialog, configure the following settings:
- Data Source Name: A name for your DSN
- Host: The IP address or host name of your Starburst server
- For SEP, the IP address or host name of your coordinator
- For Starburst Galaxy, the fully qualified host name of your cluster (e.g.,
mycompany-sample.trino.galaxy.starburst.io)
- Port: The TCP port number that your Starburst server uses
- For SEP, usually
443(configurable) - For Starburst Galaxy, always
443
- For SEP, usually
- SSL: Opens the SSL configuration dialog
- SSL Verification: Controls how strictly the driver verifies the server’s
SSL certificate. Select one of the following options:
- None: The driver does not validate the server certificate
- CA: The driver validates that the certificate is issued by a trusted CA and is not expired
- Full: The driver validates the CA and expiration date, plus verifies that the IP/host name matches the certificate’s common name or Subject Alternative Names
- Trust Certificates: The path to a PEM file containing certificates for your Starburst server that are not trusted by the system truststore
- SSL Verification: Controls how strictly the driver verifies the server’s
SSL certificate. Select one of the following options:
- Authentication: From the Authentication Type drop-down menu, choose
from the following authentication types:
- None: No authentication required
- Password: Authenticate using a username and password
- Windows Integrated: Authenticate using the current Windows user’s credentials (Kerberos or NTLM)
- Windows Password: Authenticate using a specified username and password to generate Windows credentials
- JWT: Authenticate using a JSON Web Token (access token)
- OAuth2: Authenticate using the OAuth2 authentication flow
- Catalog/Database: The default catalog for unqualified or partially qualified object references (optional)
-
Schema: The default schema for unqualified object references (optional)

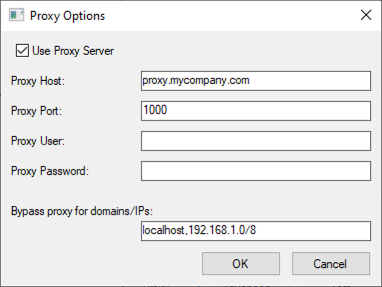
Proxy connection #
To configure a connection through a proxy server:
- In the ODBC Starburst Setup dialog, click Proxy Options.
- Select Use Proxy Server.
- Enter the Proxy Host (hostname or IP address).
- Enter the Proxy Port number.
- If necessary, enter Proxy User and Proxy Password.
- Optionally, in the Bypass proxy for domains/IPs field, enter a
comma-separated list of domains or IP addresses that do not require a proxy.
- The driver matches each entry as either a domain that contains the
hostname, or the hostname itself. For example,
sample.commatches bothsample.comandwww.sample.com, but it does not matchsample.com.org. You can specify IP addresses using CIDR notation.
- The driver matches each entry as either a domain that contains the
hostname, or the hostname itself. For example,
- To save your proxy settings, click OK.
Advanced options #
In the ODBC Starburst Setup dialog, click Advanced Options to configure additional settings:
- Allow HTTP Redirect: Enable to allow the driver to follow HTTP redirects for all HTTP requests throughout the connection lifecycle
- Ignore Broken Catalog: Enable to skip broken or inaccessible catalogs when
querying metadata via functions like
SQLTablesandSQLColumns - Cache Access Token: Cache and reuse access token to avoid multiple OAuth windows when applications reconnect
- Application Name: The name of the client application (sets the X-Trino-Source header)
- Client Tags: Comma-separated list of strings to use to identify resource groups
- Extra Credentials: Comma-separated list of key-value pairs for connecting
to external services (e.g.,
PG_UID:admin, PG_PWD:password) - Roles: Comma-separated list of key-value pairs to set roles for catalogs
(e.g.,
system:public, tpch:read_only) - Session Properties: Comma-separated list of key:value pairs for session
properties (e.g.,
query_max_run_time:10m, task_mask_writer_count:16) -
Timezone ID: The timezone ID to use to process query data (e.g.,
America/New_York). If not specified, the system timezone on the client computer is used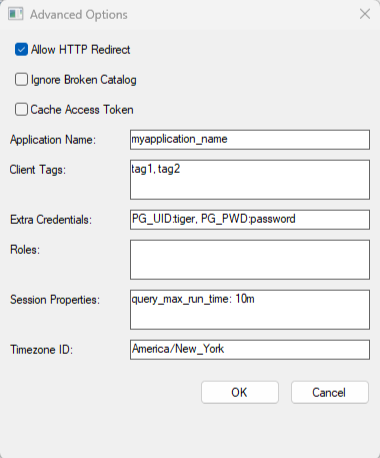
Testing your connection #
After configuring your basic settings:
- In the ODBC Starburst Setup dialog, click Test.
- If the test fails, review the error messages.
- When successful, click OK.
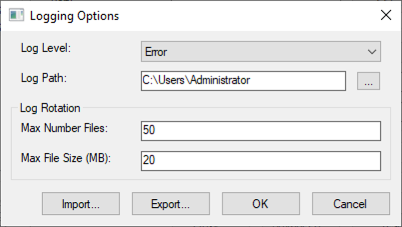
Logging options #
Enable logging to troubleshoot issues.
To configure logging options:
- In the ODBC Starburst Setup dialog, click Logging Options.
- From the Log Level drop-down menu, choose from the following options:
- Off: Disables all logging
- Fatal: Logs severe error events that cause the driver to abort
- Error: Logs error events that allow the driver to continue running
- Warn: Logs events that may result in an error if you do not take action
- Info: Logs information that describes the driver’s progress
- Debug: Logs detailed information to use for debugging the driver
- Trace: Logs all driver activity
- In the Log Path field, select a folder to store log files.
- In the Max Number Files field, enter the maximum number of log files to retain.
- In the Max File Size field, enter the maximum size of log files in megabytes (MB).
- Click OK to save your settings.
Is the information on this page helpful?
Yes
No